
Have you ever felt a little spark of curiosity about bringing an adorable monkey to life on paper, or perhaps on a screen? It's actually a pretty cool feeling, you know, to make something from scratch. Drawing can seem like a big challenge sometimes, but honestly, it's more about having a good time and seeing what you can create. We're going to explore how you can sketch out a monkey, step by step, and make it look just how you want it to.
Picture this: you've got a blank canvas, whether it's a piece of paper or a digital drawing space, and you're ready to make some art. Monkeys, with their playful antics and expressive faces, are such a fun subject to capture. They really do have a way of making you smile, and that energy can definitely come through in your drawings. We'll walk through the process, making it simple and enjoyable, so you can feel good about your artistic journey.
And you know, the neat thing is that you don't need a fancy art studio to get started. There are so many amazing tools out there, like a free online drawing application for all ages, that let you create digital artwork. You can even use natural brushes and layers, or import and save images. It's almost like having a whole art supply store right at your fingertips, which is pretty handy, in a way, for anyone just starting out or looking to explore new ways to make art.
Table of Contents
- Getting Started with Your Monkey Drawing
- Building Your Monkey's Features
- Refining Your Monkey Masterpiece
- Taking Your Art Digital
- Frequently Asked Questions About Drawing Monkeys
Getting Started with Your Monkey Drawing
So, you're ready to begin, which is fantastic! Drawing a monkey, or anything really, starts with some simple steps. It's not about being perfect right away; it's more about putting lines down and seeing what happens. We'll take it slow, just one piece at a time, and you'll see how quickly your monkey starts to take shape. It's a bit like building with blocks, really, where each piece adds to the whole picture.
Gathering Your Art Stuff
Before we jump into the actual drawing, it's a good idea to get your tools ready. If you're drawing traditionally, you'll want some paper, a pencil (maybe one that's easy to erase), and an eraser. That's really all you need to start. For digital artists, you're in luck! There are so many free online drawing tools available. These tools often let you paint online with natural brushes and use layers, which is pretty cool for experimenting. You can even find ones that are inspired by popular art programs, making it easier to create digital artwork to share online and export to formats like JPEG or PNG, so that's a nice perk.
Starting with Basic Shapes
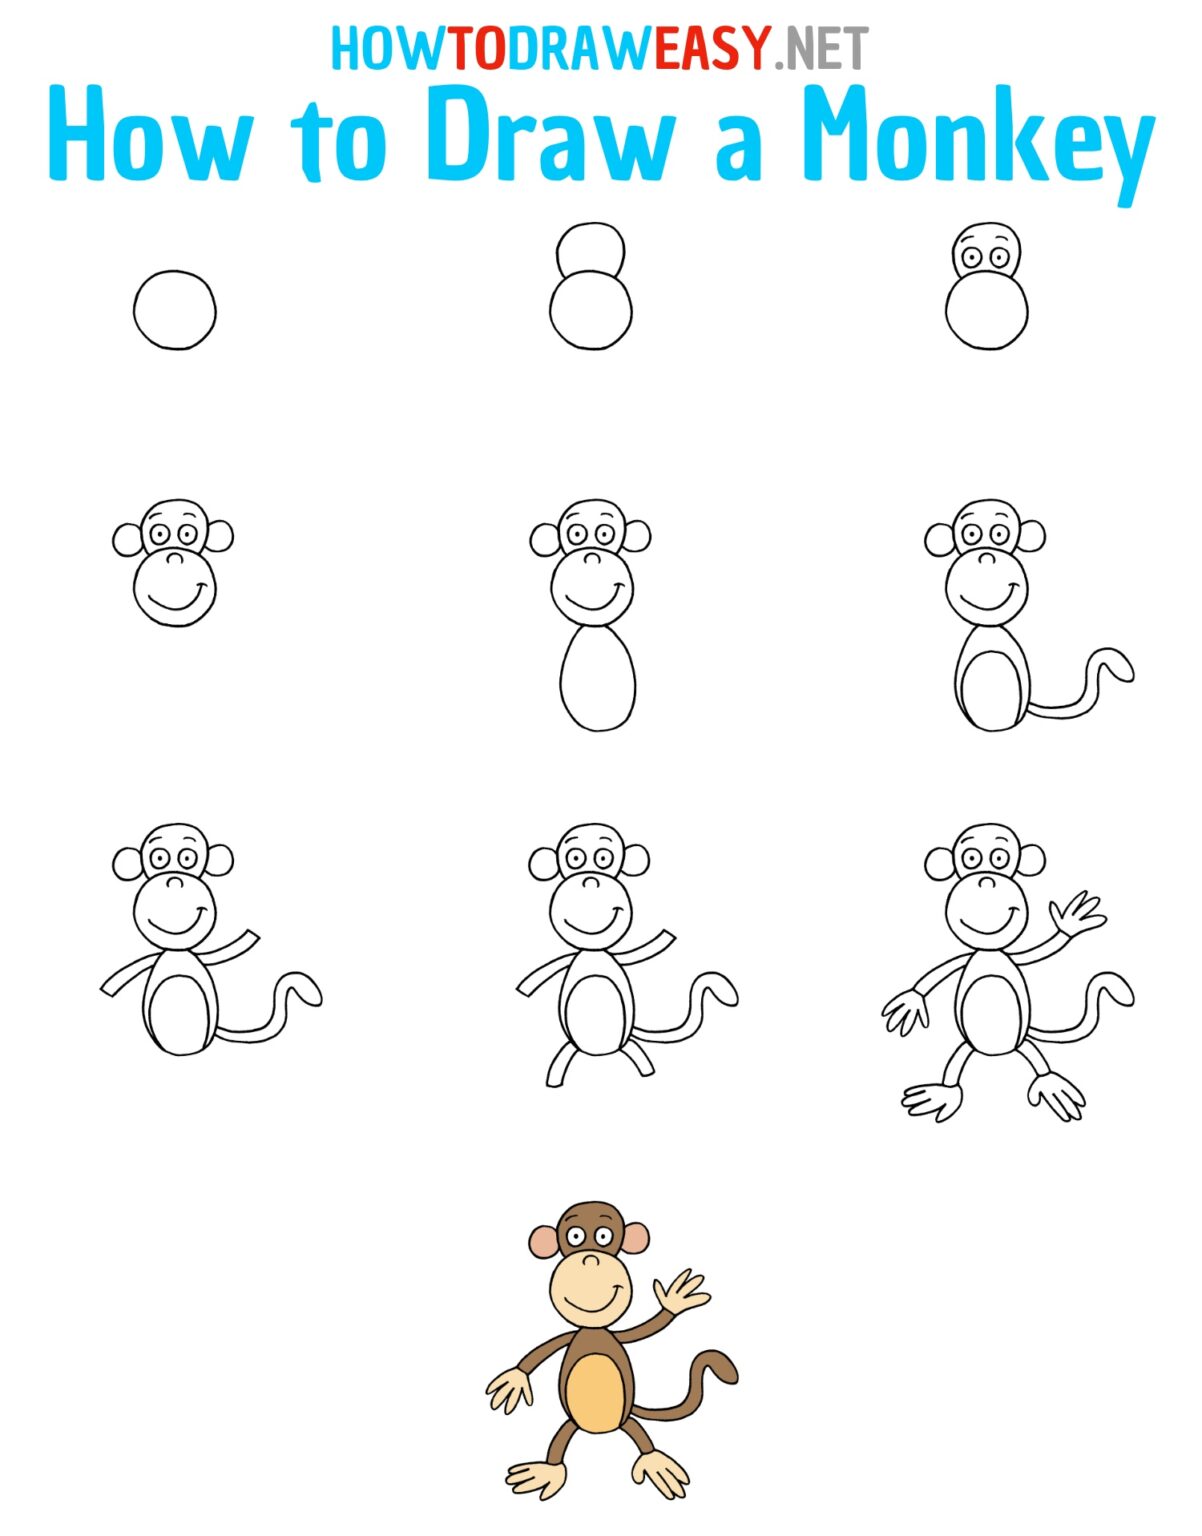
Okay, this is where the fun truly begins. Every drawing, even really complex ones, starts with basic shapes. Think of circles, ovals, and maybe some squarish forms. For a monkey, we'll begin with a couple of circles. Draw a larger circle for the head and a slightly larger, perhaps more oval shape, for the body. Don't press too hard with your pencil; these are just guide shapes, and you'll be erasing them later. It's almost like sketching out a skeleton for your monkey, just to get the proportions more or less right, which helps a lot, you know, in the long run.
Now, connect these two shapes gently. You might draw a curved line for the back and another for the belly. This gives your monkey a basic posture. You could try making the body a bit more pear-shaped if you want a chubbier monkey, or a bit thinner for a more slender one. It's really up to you and the kind of monkey you want to create. This initial stage is all about getting the general feel of your monkey's body, so just play around with it a little.
Building Your Monkey's Features
With those basic shapes down, we can start to add the specific parts that make a monkey, well, a monkey! This is where your drawing really starts to get its personality. We'll work our way around the head and then move to the body, adding those familiar elements that bring the animal to life. It's a very satisfying part of the process, actually, seeing your lines turn into something recognizable.
Shaping the Head and Face
Let's focus on that head circle you drew. Monkeys have a distinctive face shape, often with a slightly protruding snout area. Inside your head circle, draw a smaller, slightly flattened oval or a rounded rectangle for the muzzle area. This is where the nose and mouth will go. You might also add two small circles on either side of the head for the ears, which will stick out a bit. Remember, these are still light, guide lines. You can adjust them as you go, which is quite helpful, especially if you're trying to get a specific look.
Now, you can start to refine the outline of the head. Think about the curve from the top of the head down to the muzzle. Monkeys often have a little dip where their forehead meets their brow. You can gently connect these shapes, smoothing out the initial circles. It's a bit like sculpting, where you're slowly chipping away at the rough form to reveal the finer details. You know, it really is a process of refinement.
Adding the Eyes, Nose, and Mouth
The eyes are so important because they really give your monkey character. Place two small ovals or circles above the muzzle area, spaced apart. You can add a smaller circle inside each for the pupil, and then a tiny dot or even a little curved line for a highlight to make them look shiny and alive. For the nose, draw two small, curved lines for the nostrils, often at the bottom of the muzzle shape. You can then add a short line down from the nose to a simple curved line for the mouth, perhaps even a little smile or a thoughtful frown, you know, to show some feeling.
Think about the expression you want your monkey to have. Wide eyes can make it look surprised, while narrower eyes might suggest a thoughtful or sleepy look. The mouth can be a simple line, or you can add a little curve for a happy expression. This is where you really get to play around and give your monkey a unique personality. It's a bit like an actor putting on different faces, which is quite interesting.
Creating the Body and Limbs
Now let's move to the body and those long, often gangly, limbs. Monkeys have arms and legs that are quite flexible. For the arms, draw two lines extending from the upper part of the body, curving down and out. Add a small oval or circle at the end for the hand. Do the same for the legs, extending from the lower body. Remember, monkeys often sit or hang, so their limbs can be bent in interesting ways. You could draw one arm reaching out, or both legs bent as if it's sitting. It's all about thinking about how a monkey typically moves, which is pretty active, as a matter of fact.
Once you have the basic lines for the limbs, you can start to add some thickness to them. Don't make them too bulky; monkeys are generally lean and agile. Think about the joints – elbows and knees – and how they create bends in the limbs. For the hands and feet, you can sketch out simple finger and toe shapes. They don't need to be super detailed at this stage, just enough to show that they are indeed hands and feet. You know, just a general idea is often plenty to start with.
Giving It a Tail
A monkey's tail is a really important feature, and it can add a lot of dynamism to your drawing. Some monkeys have long, prehensile tails that they use to grasp things, while others have shorter ones. You can draw a long, curving line extending from the back of the body. Make it thick at the base and gradually thinner towards the tip. You could have it curve up, down, or even wrap around something. This is another area where you can really show movement and personality. It's almost like another limb, that tail, very expressive.
Consider the flow of the tail. A gentle curve can suggest a relaxed monkey, while a more dramatic, coiled tail might indicate an active or playful one. You can also add a slight taper to the end of the tail to make it look more natural. It's a pretty fun element to draw, actually, and it often completes the overall look of your monkey, giving it that familiar silhouette.
Refining Your Monkey Masterpiece
You've got the basic structure down, which is a huge accomplishment! Now comes the part where you add the finer details that really make your monkey pop. This is where your drawing goes from a simple sketch to something with texture, depth, and a bit of life. It's a bit like adding the finishing touches to a sculpture, bringing out all the subtle characteristics. You know, it really makes a difference.
Adding Texture and Details
Monkeys are covered in fur, and adding texture can make your drawing look much more realistic. Instead of drawing solid outlines, try using short, feathery strokes along the edges of your monkey's body and limbs. This mimics the look of fur. You can also add some lighter, shorter strokes inside the body to suggest the direction of the fur. Think about where the fur might be thicker or thinner, like around the face or on the belly. It's a subtle thing, but it really adds a lot, you know, to the overall impression.
You can also add other small details, like wrinkles around the eyes or mouth to show expression, or small lines on the hands and feet to suggest pads and claws. Don't overdo it; sometimes less is more. These little touches can really bring your monkey to life without making it look too busy. It's pretty amazing how a few small lines can convey so much, actually.
Playing with Shading and Depth
To make your monkey look less flat and more three-dimensional, you can add some shading. Think about where your light source is coming from. Areas that are further away from the light, or are in shadow, will be darker. You can use lighter pressure with your pencil for lighter areas and heavier pressure, or layer your strokes, for darker areas. This creates a sense of depth and form. For example, the underside of the limbs or the area under the chin might be a bit darker. It's a bit like painting with light and shadow, which is quite an interesting technique.
You can also use cross-hatching (drawing overlapping lines) or stippling (using dots) to create different textures and shading effects. Experiment with different techniques to see what you like best. Shading can really make your monkey feel like it's popping off the page. It adds so much character and realism, you know, when done thoughtfully.
Making Your Monkey Expressive
This is where your monkey truly gets its personality! Think about different monkey expressions: curious, playful, mischievous, thoughtful. You can adjust the eyebrows, the shape of the mouth, and even the tilt of the head to convey different emotions. A slightly raised eyebrow might suggest curiosity, while a wide, open mouth could be a playful grin. It's a bit like being a director for your own little character, which is pretty cool.
You can also think about poses. Is your monkey swinging from a branch? Sitting and eating a banana? Peeking out from behind a tree? The pose can tell a story and add even more life to your drawing. Don't be afraid to try different things. It's all about having fun and letting your imagination guide your hand, which is, you know, what art is really about.
Taking Your Art Digital
Once you've got the hang of drawing monkeys with traditional tools, or if you prefer to start digitally, there are some fantastic online resources that can really help you out. The world of digital art has so many possibilities, and it's a very accessible way to create and share your work. It's almost like having an endless supply of paper and paints, but all on your computer or tablet, which is quite convenient.
Exploring Online Drawing Tools
As mentioned, there's a free online drawing application for all ages that lets you create digital artwork. These tools often come with a variety of brushes, layers for organizing your drawing, and editing capabilities. You can paint online with natural brushes, which gives you a similar feel to traditional art. Some tools even let you import, save, and upload images, making it easy to work with references or continue a drawing later. You know, it's pretty amazing how much you can do without downloading anything.
There are also tools like Autodraw, which pairs machine learning with drawings from talented artists to help you draw stuff fast. Or Magma, where artists draw, collaborate, and grow together, allowing you to join shared canvases and take part in live art jams. Pixilart is another great one, a free online drawing editor and social platform for everyone, where you can create game sprites, make pixel art, and share artwork. These platforms really open up new ways to be creative and connect with others who love art, which is a nice community aspect.
Sharing Your Amazing Creations
Once your monkey drawing is complete, whether it's a quick sketch or a detailed digital painting, don't keep it to yourself! One of the best parts about creating art is sharing it. Many of these online drawing applications allow you to export your artwork to popular image formats like JPEG, PNG, SVG, and PDF. This means you can easily share your monkey on social media, with friends and family, or even print it out. You know, it's a great way to show off your hard work.
Some platforms also encourage you to add your drawings to large doodling data sets, shared publicly to help with machine learning research. This means your art could actually help teach a neural network to recognize drawings, which is a pretty cool way to contribute. You can also learn more about digital art tools on our site, and perhaps even find inspiration in our gallery of animal drawings. It's all about connecting and growing as an artist, which is a truly rewarding experience, in some respects.
Frequently Asked Questions About Drawing Monkeys
People often have questions when they're learning to draw, and that's totally normal! Here are a few common ones about drawing monkeys, which might help you out as you go along.
How do I make my monkey look more realistic?
To make your monkey look more real, focus on the details of its fur, like using short, varied strokes to show texture. Pay attention to the subtle curves of its face and body, and try to add shading to give it depth. Observing real monkeys, maybe through pictures or videos, can also really help you capture their unique features and movements. It's a bit like studying a subject to really get to know it, you know, before you try to capture its essence.
What are some easy poses for a beginner monkey drawing?
For a beginner, starting with a monkey in a simple sitting or standing pose is often easiest. You can have it facing forward or slightly to the side. Avoid complex actions like swinging or jumping at first. Once you're comfortable with the basic form, you can gradually try more dynamic poses. It's all about building up your skills step by step, which is a pretty good approach for anything new, actually.
Can I draw different types of monkeys using these steps?
Absolutely! While these steps give you a general guide, you can definitely adapt them to draw different monkey species. Macaques, chimpanzees, or marmosets all have unique characteristics. You might adjust the length of the tail, the shape of the face, or the proportions of the limbs. The basic shapes remain the same, but the details change, which is pretty neat. It's like having a recipe and then adding your own special ingredients to make it unique.

Detail Author:
- Name : Amina Schoen
- Username : kvandervort
- Email : ojones@bosco.net
- Birthdate : 1980-08-12
- Address : 221 Myrtie Estate Port Roselyn, HI 03548
- Phone : (843) 554-2808
- Company : Kuhlman, Frami and Hill
- Job : Tree Trimmer
- Bio : Nobis alias quibusdam voluptatibus et labore consequuntur. Laudantium accusantium temporibus qui et perferendis rerum. Ipsa eius sed voluptatibus dolores. Sit aut harum tempore illum.
Socials
tiktok:
- url : https://tiktok.com/@funk2020
- username : funk2020
- bio : Qui ea omnis dolorum esse voluptatibus.
- followers : 5013
- following : 2275
facebook:
- url : https://facebook.com/ellsworth6517
- username : ellsworth6517
- bio : Sed repudiandae non animi quos atque. Beatae ad labore occaecati officia.
- followers : 5114
- following : 937
